Wholemeal bread with malt and tahini
|
Ingredients : Strong, white wheat flour, whole wheat island wheat, whole wheat flour, light malt flour, sourdough, water, salt, honey, tahini Tool: Dough spatula, a large bowl, either two small 1.7 l tins or two rising baskets, a cast iron pan and scraping knife |
Time consumption: Day 1 evening. Sourdough is refreshed. 5 minutes Day 2 morning. Dough is mixed and folded. 3 hours. Day 2 afternoon, Dough is shaped and proofed, 60 min. Evening or morning. Bread is baked. 60 min. |

When I was 18 years old, I got Jørn Ussing Larsen's baking book Fremtidens brød af pretildens korn . In addition to getting to know spelled and other exciting cereals, I also read for the first time that there were small flour mills for home use. It seemed completely wild and extravagant - and completely and utterly beyond my reach. And for some reason this feeling has not left me. But now I've turned 40, and my husband looked me deep in the eyes and said: "Now. Ordering. You. The. DAIRY!” Some deep breaths all the way down to my stomach, a run of a few months, and then one morning I did it.
The aroma of the freshly ground, silky flour is almost intoxicating – mild, nutty, slightly earthy. And the taste... oh my heart, what more do you want!
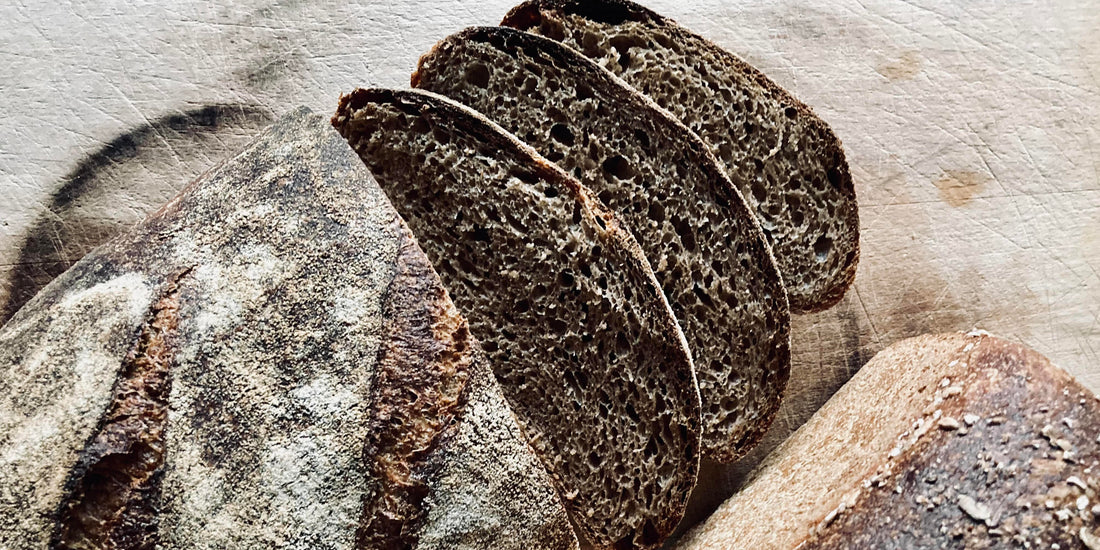
As I have never subscribed to the motto "less is more", I of course had to try baking a bread consisting predominantly of freshly ground wholemeal flour. It turned into this powerful, juicy case, where malt and tahini (sesame paste) contribute edge and umami, and a little slather of honey rounds off the taste. The bread is a bit reminiscent of the Swedish limpa (spiced rye bread), but without spices and definitely not as sweet.
The dough is firm enough to bake free-standing, but if you feel a little uncertain about it - or just like my children: that shortbread is the best thing in the world next to birthday buns, then the recipe is also excellent for this.
Be aware that freshly ground flour is extremely active. And when such a large part of the dough is whole wheat flour, it can be a little difficult to control. So if you order flour through Rugkop (and/or grind your own flour), I recommend that you follow the recipe and start the dough early in the morning, knead it in the middle of the day and bake the same afternoon/evening. Then you can get a nice piece of bread for a late cup of evening tea. If you bake with flour from the supermarket (and not a bad word about it, you can get very good flour in most supermarkets by now - it's just typical that it's ground at least a month before it lands on the shelves), you can instead cold proof the raised bread for the next day.
Bon appetit!
Tool:
Dough spatula, a large bowl, either two small 1.7 l tins or two rising baskets, a cast iron pan and scraping knife.
Ingredients:
- 200 g strong, white wheat flour, e.g. Type xx
- 100 g of whole grain island wheat
- 600 g whole wheat flour
- 100 g light malt flour*
- Approx. 200 g refreshed, merrily bubbling sourdough
- 850-900 g water**
- 25 g of salt
- 20 g of honey
- 50 g tahini
Day 1, late evening:
- Freshen up your sourdough: mix a teaspoon of the sourdough starter (here a rye cup sourdough works absolutely fine as a starter) with approx. 1 dl cool water and 1.5 dl light flour, and stir thoroughly. Leave the sourdough covered (but not hermetically sealed, so it cannot breathe) on the kitchen counter overnight.***
Day 2, early morning:
- The types of flour are mixed well in a large milk dish or similar, and most of the water (i.e. retain 50-100 g of water) and sourdough are added and mixed to form an uneven porridge. However, make sure all the flour is wet.
- Let the dough rest for approx. ½ hour – called autolysis: the flour absorbs the moisture and its gluten starts to work.
- Add salt, honey, tahini and the rest of the water (see the note about water) and work the dough well. Use possibly a mixer on a very gentle program – the dough does not need to be beaten, but it benefits from being kneaded well through here.
- The dough rests, and approx. every half hour for the next few hours stretch and fold the dough by grabbing the side, stretching the dough and folding it over itself; rotate the bowl a quarter turn and repeat 4-5 times.
- After the series of foldings, the dough must rest for a few hours or until it has grown approx. 20%. It doesn't sound like much, but it will already have risen quite a bit during the folding process.
Day 2, approx. in the middle of the day:
- Carefully pour the dough onto the table, divide it in half, and quickly and gently form into balls. Feel free to use the dough spatula to keep the dough clear of the table, it can stick a bit here. Don't be tempted to pour a lot of flour on the dough, but instead rinse your hands and the dough spatula in cold water. Check out Michael's video from Rugkop's baking course below, he shows the technique really well.
- After a rest of 15-20 min. the loaves can be tightened once more. Either they just get another turn as above and put in baking tins, or you can shape them according to all the rules of art (see Michael's video where he shows the "envelope method") and put them in a lifting basket.
- Cover the loaves with a tea towel and leave them on the kitchen counter for an hour before putting them in the fridge until the evening.
- When the loaves have risen so that they just arch over the edge of the mould/rising basket, they are ready to bake. If you use molds, you can also choose to leave them on the kitchen table - then they will be ready to bake during the afternoon. I would not recommend it if they are raised in a basket, because then the risk of the dough splattering when you turn the bread in the pan is imminent.
Day 2, evening
- If you bake mold bread, the baking procedure is as follows:
- Heat the oven to 220 degrees.
- Place the loaves in the center of the oven and throw a cup of water into the bottom of the oven to create some steam.
- After 20 minutes, open the oven door to let the steam escape.
- After another 20 minutes, turn the loaves out of the tin and continue baking for a further approx. 10 minutes or to a core temperature of approx. 95-98 degrees.
- For freestanding, the procedure is:
- Put a pan in the oven and heat it up to 250 degrees.
- Turn a loaf of bread into the pan, score it with a razor blade or a sharp knife, and put the lid on. Let it bake for 20 minutes.
- Take the lid off the pan, lower the temperature to 220 degrees, and continue to bake for 25-30 minutes.
- Remember to let the oven heat up well again before baking other bread.
- Let the loaves cool completely (if you can!) and ENJOY.
Revka El Baz
*In a previous recipe , I have written a bit about the difference between light and dark malt flour. In short, light malt flour is active and can replace a small part of the wholemeal flour in the dough, while dark malt flour is inactive and should therefore be added as a flavoring agent - i.e. approx. 1-2 tbsp. per kilo of flour. If you have dark malt flour in the cupboard, you can therefore use 100 g more wholemeal flour than is stated in the recipe and add a bit of the dark. Another (really good) option is to use wormwood, which is a brand new product on the market. This, like the light malt flour, is active and is used in exactly the same way.
**The amount of water is partly quite high, partly quite approximate. Whole grain flour really absorbs a lot of liquid due to the high fiber content - and even more when it is freshly ground. But you can also risk that the dough first seems a little dry and then "throws" some of the water again during the autolyse, so that you end up with a flour soup. That's why it's important to work with restraint and follow your feel for the dough: it will never be quite as supple and soft as a dough with a high content of bright flour, but must still feel firm and yielding at the same time. You have to try your hand a little.
***The cool water and the large proportion of flour compared to water means that the sourdough activates more slowly. That way, it won't have completely collapsed again the next morning when you need to use it: it should preferably be full of life and bubbles and ideally be approx. doubled in volume. BUT: if it has lost its breath a little, it can easily be used anyway, so don't let yourself be put off if that is the case. Your bread will just be a little more sour, and probably also a little slower to rise.
Dough is shaped into a ball (Excerpt from Rugkop's online baking course )
The envelope method: The dough is shaped like an envelope (Excerpt from Rugkop's online baking course )
Anyone can learn to bake light sourdough bread. Buy our online course and have flour and equipment delivered to the door.