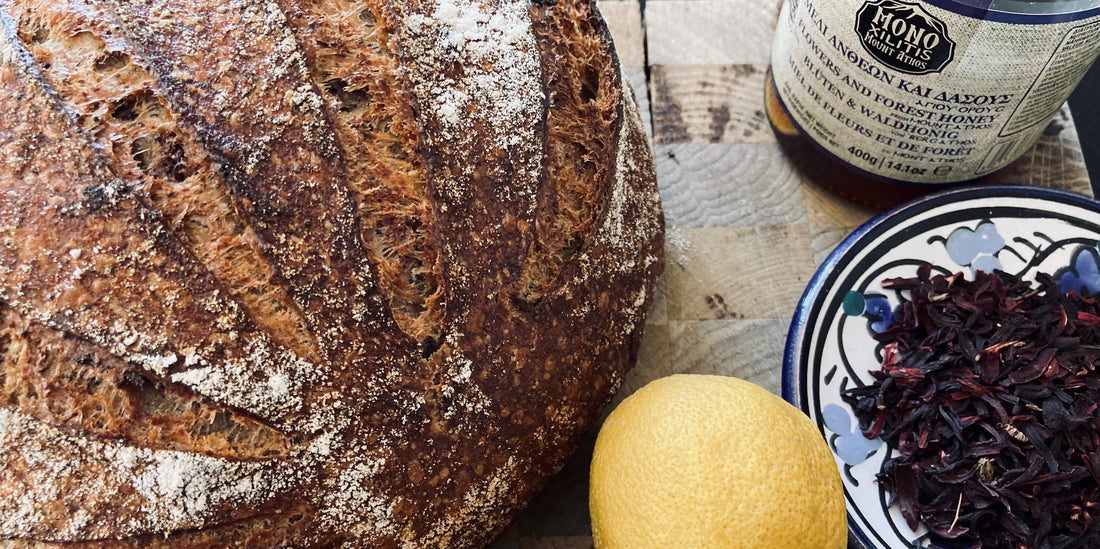
Emmerbrød with hibiscus and forest honey
|
Ingredients : Emmer flour, durum wheat, baking wheat flour, sourdough, water, salt, blue birch. lemon, hibiscus flowers, honey. Tool: Dough tray, dough spatula, two rising baskets, slicing knife and cast iron pan. |
Time consumption: Day 1. Sourdough is refreshed. 5 minutes Day 2. Dough is mixed, folded and raised. 5 hours Day 3. Baked. 45 min. |

In my last blog post, I fantasized a bit about my spring-almost post-corona trip in Jægersborggade, and I promised that the wonderful forest honey would be allowed to play first violin in an upcoming recipe. However, it wasn't quite a solo place. Because I was supposed to visit my long-missed friend but had to cancel due to a nasty spring cold brought home with love from the children's institution... So I had to miss her for another time. And to fill that time, I decided to bake her a loaf of bread and slip by with it at a very anti-contagion-cold-friendly distance. She loves hibiscus, so hibiscus had to be!
I found a recipe for a cake where the flowers had to be soaked in honey-lemon water and thought that it might be able to be used in my breads (minus the lemon juice, which would probably make coke with the sourdough, I've read somewhere). At the same time, I had an old idea to transform the classic lemon-birch cake into a loaf of bread. So here comes a hybrid that lies somewhere between a cake and a bread without being a brioche. That's pretty cool, right?
My friend was delighted with the bread, and so were my taste buds. So go ahead, a little recipe.
Bon appetit!
Tool:
Dough spatula, two rising baskets lined with tea towels, sharp knife or razor blade and cast iron pan
Ingredients:
- 200 g coarsely ground emmer
- 100 g coarsely ground durum wheat
- 700 g strong, white wheat flour, e.g. Type xx
- Approx. 150 g refreshed, merrily bubbling sourdough
- 700 g water + 50-100 g water together with the salt
- 25 g of salt
- 100 g of blue birch
- Lemon peel from 1 organic lemon
- 2 tablespoons of strong honey, e.g. a forest, mountain or chestnut honey (without going bananas, I can highly recommend, if you are in Copenhagen, to stop by HONNING in Jægersborggade and stock up; that shop is simply too wild...)
- 30 g of hibiscus flowers soaked in ½ dl of water with 3 tablespoons of honey added*
- Rice flour for dusting the tea towels in the rising baskets
Day 1, morning:
- Refresh your sourdough.**
- When the sourdough is approx. doubled in volume and can handle a flow test, it is ready to bake with.
Day 2, afternoon:
- The types of flour are mixed well in a large milk dish or similar, and water and sourdough are added and mixed to form an uneven porridge - make sure, however, that all the flour is wet and that there are no lumps.
- Let the dough rest for approx. ½ hour.
- Salt, birch bark, lemon peel, drained hibiscus flowers, honey and the last water are added and worked well into the dough.
- The dough rests, and approx. every half hour for the next few hours stretch and fold the dough by grabbing the side, stretching the dough and folding it over itself; rotate the bowl a quarter turn and repeat 4-5 times. The first few times you can be a little energetic, but as the dough starts to rise, you have to be more careful not to knock the air out of the dough.
- When the dough has risen approx. 20%, it is ready to be shaped and set for proofing:
- Carefully pour the dough out onto the table and divide it in half; quickly and gently form them into balls by pulling them around and towards you using a metal dough scraper. This is a delicate matter, because the dough is a little sticky, and you can easily end up working it too much. You should NOT do that, because then the crumb will be dense and compact - less is more , and feel free to check out Michael's video to get the technique in place. It is worth spending some time on.
- After a rest of 15-20 min. the loaves can now take their final shape: oblong or round to taste. Here, too, I will leave it to Michael to show the technique, because it is a hundred times easier to show than to explain.
- Place the loaves seam side up in floured proofing baskets and put them in the fridge to proof.
Day 3, morning:
- Turn a loaf of bread out into the pan's lid if the lid is flat/without a knob on top - otherwise you can turn the bread out onto a piece of baking paper and lift the bread into the pan by holding a few pieces of the paper.
- Cut the bread with a sharp knife or razor blade and put the lid on.
- The bread must first be baked with the lid on for 20 minutes. at 250 degrees and without a lid for 25 min. at 220 degrees. Remember to heat up the oven again before putting bread no. 2 in.
- Allow the bread to cool completely (or as much as you have the patience for), and eat it with cold butter in raw quantities instead of cake - a small dollop of bitter orange marmalade is also not out of the way.
*Put the flowers in a bowl and pour water and honey over and stir it through so that all the flowers are covered. Let the mixture soak for at least ½ hour and preferably longer. When you need to use the flowers, drain them well - but don't throw away the remaining juice! Hibiscus are full of all sorts of good and healthy things, and the juice tastes absolutely fantastic mixed with a little water or juice or drizzled over a good, fat Greek yogurt.
**If you have purple wheat in the cupboard, you can use some of it for the refreshment together with light wheat flour - it supports the beautiful red hue from the hibiscus flowers. You just have to be aware that wholemeal flour activates the sourdough faster, and afterwards you have to be quite careful with your bread dough, because it rises "wilder" than on a completely light sourdough. If you still want to use whole grain in the sourdough but, for example, want to freshen it up early in the morning before you go to work, you can use slightly cooler water (not ice cold!). Then it's a little slower and you can probably just catch it when you get home.
The dough is folded and stretched (Extracts from Rugkop's online baking course )
The envelope method: The dough is shaped like an envelope (Excerpt from Rugkop's online baking course )
Anyone can learn to bake light sourdough bread. Buy our online course and have flour and equipment delivered to the door.