Rye-amok and spelled - and a little fun with apples and walnuts
|
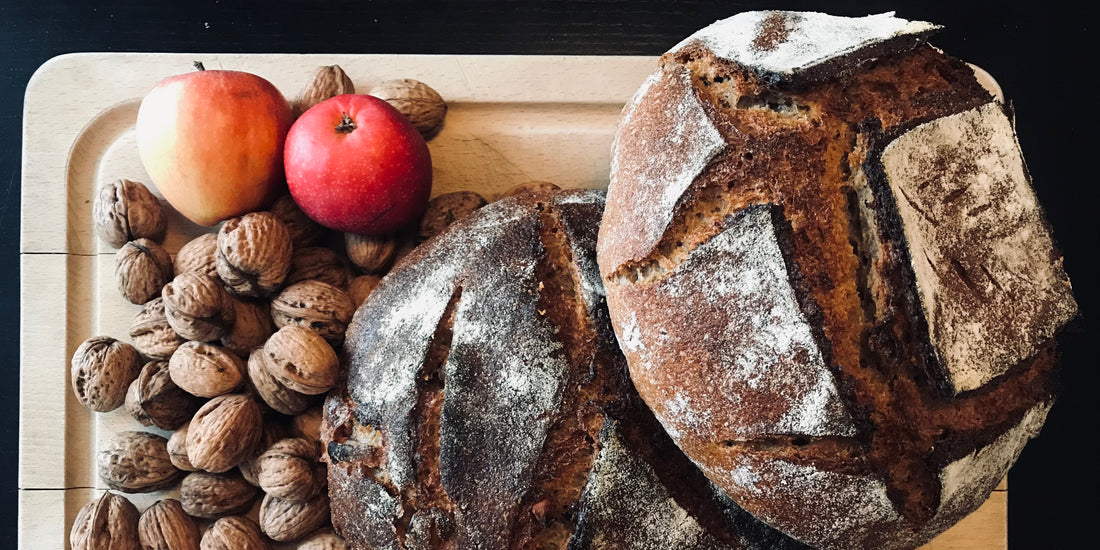
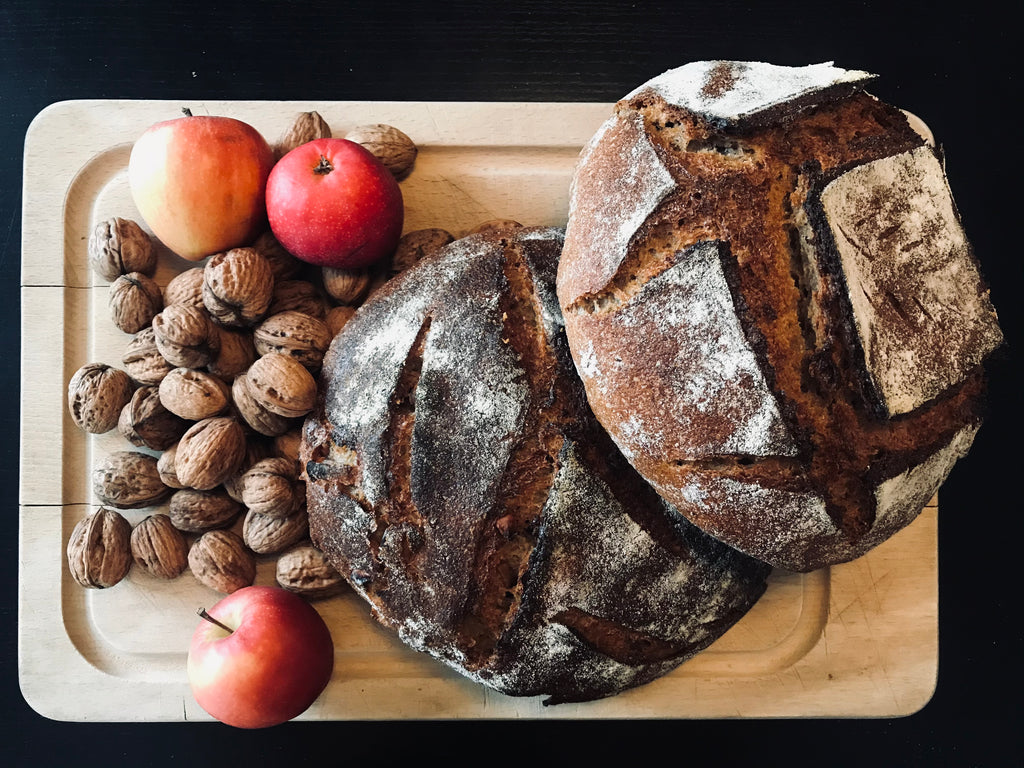
Ingredients: Rye flour, whole grain spelled, finely sifted wheat, light sourdough, salt, water, syrup/honey, apples, walnuts. Tool: Dough spatula, two lined proofing baskets with tea towels, carving knife and cast iron pan. |
Day 1: Sourdough refreshed (2 min) Day 2: The dough is mixed and folded (2 hours) Day 3: Bread rises, shapes and bakes (6 hours) |
I have become obsessed with rye. I want dense, dark, rustic boules with a delicate balance between acidity and sweetness – the former from long, cold fermentation, the latter from a drizzle of syrup or honey. Maybe it's the endless winter, maybe the equally endless corona shutdown that does it: I simply need concentrate! You need depth and warmth and solid dietary fiber to get through this and come out on the other side as a whole person. I don't like the old saying: that nothing is so bad that it is not good for something. I am sitting in my safe home with my safe job, and no one in my immediate family suffers harm other than the common haddock. But there are people who break their necks on this. And every time I read somewhere that in this time we have the opportunity to learn to be together in a new way and that we must make the best of it, I think: and what about all those who are not in such a privileged situation that they learn anything but just freeze in body and soul and watch their lives crumble?
So, in order not to go completely nuts over the state and injustice of the world, I resort to the best remedy I know next to hugging my kids: baking therapy. And that's really what it is for me. A kind of meditation which is so cleverly arranged that, on top of that, quite often an acceptable or even good result comes out of it. And as the icing on the cake, it is made to be shared with others or given away. And people will be HAPPY. I don't live to make other people happy, but I become a better and happier person when that happens.
So here's an invitation: bake a little more than you and your possible family can eat, and give it away. To your friend, your aunt or your neighbor. As a bonus, you get double the baking experience every time - and you can choose to bake one bread without any frills and stuff all kinds of exciting things into the other. Then you have a good excuse to cut both loaves in half and see how beautifully the crumb turns out. And if it's not pretty, never mind: it mostly tastes great anyway!
Tool:
Dough spatula, two rising baskets lined with tea towels, sharp knife or razor blade and cast iron pan
Ingredients:
400 g rye flour
100 g wholemeal spelled
500 g strong wheat flour, e.g. Kornymølle no. 1
Approx. 200 g refreshed sourdough
650 g water + approx. 50 g of water together with the salt
25 g of salt
A few tbsp. syrup or honey
Rice flour for dusting the tea towels
For the apple-walnut bread:
A few handfuls of walnuts in large chunks – I use organic ones with shells and crack them myself, because then I'm sure they're not the least bit rancid. It takes a while, but I like sitting with it. If you don't feel like this, you can get by just fine with a bag of organic from the supermarket!
A firm, preferably slightly sour apple with peel and cut into small cubes
Possibly. a little virgin in the green (also called nigella seed)
Day 1 , morning: refresh your sourdough
Day 2 , afternoon/evening:
- The types of flour are mixed well in a large milk dish or similar, and water and sourdough are added and mixed to form an uneven porridge - make sure, however, that all the flour is wet.
- Let the dough rest for approx. ½ hour.
- The salt and the last water are added and worked well into the dough.
- The dough rests again for half an hour, and is then kneaded thoroughly. If you have a fairly gentle mixer, it can definitely handle the peas. Unfortunately, my own old Kenwood from the 1970s burned down a few months ago while trying to whip up an island wheat dough (it really didn't turn out well!), so I had to get hold of a larger amount of shortening for the loaves myself here. But it was also a very good way to round off the day.*
- Divide the dough in half, form them into balls and let them rest for approx. 10 min., before one gets a quick tightening and is placed in a container. The other is spread out on a table that has been slightly damp so that the dough doesn't stick too much (it can't avoid being a bit of a messy affair though!). Walnut kernels, apple pieces and possibly virgin in green is spread on the dough, which is then folded over itself into an uneven ball and placed in another container.
- Leave the two doughs on the kitchen counter for an hour, until there is clear activity (if you have transparent containers, you can see to your delight how small air bubbles form on the sides), before putting them in the fridge until the next day .
Day 3 , morning:
- Take the dough out of the fridge 2-5 hours before you want to bake the loaves. Let them stand and heal for a little over an hour before the next step.
- Carefully pour the dough onto the table and quickly and gently shape it into balls. (See video) Feel free to use the dough spatula to keep the dough clear of the table, it can stick a little here. After a rest of 15-20 min. the loaves can now take their final shape: oblong or round to taste.** Place them seam side up in floured proofing baskets and set them to proof on the kitchen counter (if they show a lot of activity, put them in the fridge if necessary).
Video: Dough is shaped into a ball (Excerpt from Rugkop's online baking course )
- While the dough is rising, place a cast iron pan in the oven, which is heated to approx. 250 degrees.
- Turn a loaf of bread out into the pan's lid if it is flat/without a knob on top - otherwise you can turn the bread out onto a piece of baking paper and lift the bread into the pan by holding a few pieces of the paper. Put any refrigerate bread number two while the first bakes so it doesn't rise.
- Cut the bread with a sharp knife or razor blade and put the lid on.
- The bread must first be baked with the lid on for 20 minutes. at 250 degrees and without a lid for 30-35 min. at 220 degrees. Remember to heat up the oven again before putting bread no. 2 in.
*A little bit about kneading a rye wholemeal dough by hand. It is recommended to knead in stages: knead, rest, knead, rest... The large amount of rye makes the dough quite sticky to work with, so use a dough spatula to keep the dough clear of the table and hands, and regularly put a little water on your hands. It takes a little practice, and the trick is to avoid touching the dough for too long at a time. Fast and resolute movements, where you make sure to stretch the dough well. Finally, you will be able to do the so-called "window test": put water on your hands and pull up a slice of the dough. When it can be pulled out to a reasonably thin membrane without breaking, the gluten network has been well activated and can hold some air during proofing. The window will never be as thin and strong as in a wheat dough on predominantly fine-sifted flour. But a little is also right.
**When baking with a lot of whole grains, you must not work the dough too much in the last phase. The gluten network is quite fragile, and you can easily take the breath away from the dough. I shape a round loaf without additives like this: sprinkle the ball of dough lightly and turn it so that the underside faces up. Grab each side of the dough and fold in toward the center; do the same with the other two snips and repeat four more times so that you have something that looks like a round package. Turn the ball over and let it rest for a few minutes before placing it seam side up in a basket. The dough with walnuts and apples does not need any other treatment than the first quick and gentle rounding (see Mikael's excellent video below). After a short rest on the table, it is also placed in a lifting basket.
Mikael Krogdal shapes the dough like an envelope (Excerpt from Rugkop's online baking course )
Anyone can learn to bake light sourdough bread. Buy our online course and get flour and equipment delivered to your door.