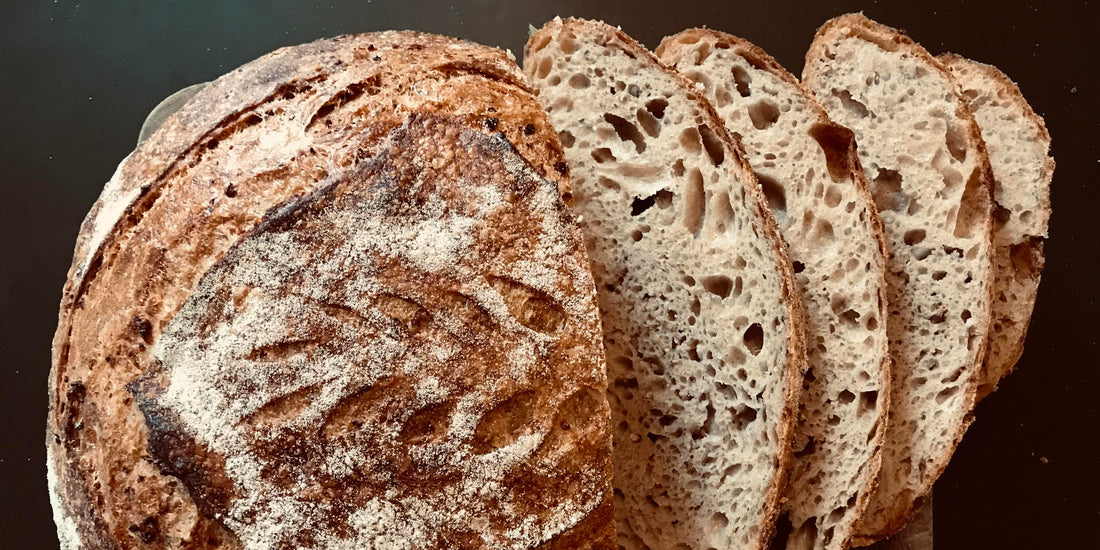
Country bread with soaked barley groats and walnut oil

|
Ingredients: Spelled flour, stone-ground wheat, finely sifted wheat, light sourdough, salt, barley groats, walnut oil. Tool: Dough spatula, two rising baskets, sharp knife or razor blade and cast iron pan |
Day 1: Sourdough refreshed (2 min) Day 2: Bread dough is mixed and folded (3 hours) Day 3: Bread is shaped, proofed and baked (2 hours) |
I love barley roe with pieces of fruit, walnut kernels and a dollop of mascarpone on it, and I've been wanting to try turning it into a bread for a long time. However, my family is not very fond of "clumps" in the bread, and ideally it should be baked in shape and have a dense, soft crumb - alas! What do you do when you yourself are a sucker for coarse, sour country bread with a thick, crunchy crust? Sometimes I give it a go and just bake what I want - and take the result (if it's successful) to my less picky colleagues. But now it's Christmas, and I can't, no matter how fond of bread I am, devour two whole loaves by myself... So it had to be the art of compromise: A country bread with soaked barley and walnut oil to give the flavor without the crunch. I could have given it some mascarpone as well, but then it would have been at the expense of the crispy crust... So it just comes on top instead of butter along with a few slices of pear!
To lift the heavy porridge, I used a lot of strong, white flour. The nutty flavor of the spelled supports the sweetness of the barley quite nicely, and the walnut oil does just what it needs to do.
Ingredients (makes 2 loaves of approx. 1kg)
150 g easy-sifted spelled (I only had whole grain spelled in the cupboard, so I sifted even the largest parts of the shell with a regular sieve)
500 g baking-strength, finely sifted wheat flour (e.g. Kornbymølle no. 1 )
Approx. 150 g refreshed, merrily bubbling sourdough
650 g water + 50-100 g water together with the salt
24 g of salt
Approx. 400 g of soaked barley groats (approx. 1.5 dl of groats soaked in approx. 2.5 dl of boiling water with a sprinkle of salt added) – the consistency should be a fairly stiff porridge, where the groats are tender but still have a bite.
2-3 mature tablespoons of walnut oil
Day 1, morning: refresh your sourdough
Day 2, afternoon/evening:
- Pour boiling water over the grits and set aside. When the porridge has cooled, stir in the walnut oil.
- The types of flour are mixed well in a large milk dish or similar, and water and sourdough are added and mixed to form an uneven porridge - make sure, however, that all the flour is wet.
- Let the dough rest for approx. ½ hour - called "autolysis": the flour absorbs water and its gluten begins to work.
- The salt and the last water are added and worked well into the dough.*
- The dough rests for 5-10 minutes, after which it is kneaded well on the table by energetically stretching and folding it over itself many times (avoid punching the dough, it will never become elastic and velvety!). You can advantageously give it a few breaks to collect itself along the way. Alternatively, you can do as Michael shows in Rugkop's very own online baking course (see video below**): gently stretch and fold the dough 4-5 times with approx. ½ hour interval over a couple of hours or three. It's just a little trickier when you add ingredients such as the porridge here, because then you have to put it in after the first or second set of folds (see the next step below), and it's a delicate matter to stretch and fold a dough with porridge i (or nuts/seeds/fruit) …
- The dough rests again for approx. ½-1 hour, after which the barley root is folded into the dough; if you don't have a large dish that allows the dough to spread over a relatively large surface, you can lay it out on the table: spread the porridge over the dough in an even layer and press it down well. Then fold the dough over itself by grasping one side and folding it all the way over to the opposite edge; turn the bowl a quarter of a turn and repeat 4-5 times until you can feel that the dough is completely stretched and the porridge lies in many fine layers between layers of dough.
- The dough rests again for approx. ½ hour, folded once or twice, depending on how long it can hold without cracking, and left to rise in a cold place. Here in the mild winter, I like to divide the dough in half already now and put the two containers out on the balcony overnight. Do you have a cold basement, a carport or similar. is also good - the temperature should ideally be somewhere between 2 and 7 degrees, so check the weather forecast. If there is frost, it is safer to put the dough in the refrigerator. The advantage of dividing the dough already here is that you can let one stand and enjoy a day longer than the other and in that way get freshly baked bread two days in a row without making any more of it.
Day 3, morning or later:
- Depending on how cold the dough has been (and how fresh the flour is: completely freshly ground flour can even be VERY active even with cold proofing), take the dough to room temperature 2-5 hours before you want to bake it. When you take it in, you can take off a small lump, shape it into a ball and put it in a glass of water. When it floats to the surface, the dough has risen (and maybe needs a little help along the way: it can occasionally stick to the bottom of the glass, so I usually poke it a little when impatience starts to kick in).
- Carefully pour the dough onto the table and quickly shape it into a ball. Feel free to use the dough spatula to keep the dough clear of the table, it can stick a bit here. After a rest, it can now take its final shape: oblong or round to taste - check out Michael's video (see below ***) - it's easier to show than explain - and place it seam side up in the floured proofing basket. Put it in the fridge to proof.
- The loaves should not rise for too long: typically an hour or two in the fridge. When you stick a floured finger a cm into the dough, it should still be able to level the hole almost again, so that there is just a mark left on the surface: this means that it still has power left for the coveted "jump on top". Here you can really talk about fingerspizengefühl. As you can see in the picture, I baked it just a little too late, which is why it hasn't got "ears" during baking.
- While the dough is rising, place a cast iron pan in the oven, which is heated to approx. 250 degrees.
- Turn a loaf of bread out into the pan's lid if it is flat/without a knob on top - otherwise you can turn the bread out onto a piece of baking paper and lift the bread into the pan by holding a few pieces of the paper.
- Cut the bread with a sharp knife or razor blade and put the lid on.
- The bread must be baked for 20-25 minutes. with lid and 25-30 min. without a lid at 220 degrees.
- It is always important to let the bread cool down well, and when there are soaked kernels or porridge in it, it is extra important: the crumb must be allowed to settle, otherwise it will become soggy as in... If you manage to wait, you will get on the other hand, the most creamy, delicious thing!
* A bit about adding water: It's very up to date to work with super wet doughs, and in general there seems to have been a bit of a sport in seeing how wet a dough you can handle and still get a reasonably upright loaf out of that. But when you add soaked cracked kernels or semolina, you have to hold back a little with the water, otherwise the bread risks becoming lumpy. So I started by adding 50g of water along with the salt and then gave it a bit more during the kneading. So I don't know exactly what I landed on. I have since found out that there is a very traditional (French) way to adjust the texture of the dough called bassinage . So if you are curious and/or geeky, you can google it.
** How to fold the dough (Excerpt from Rugkop's online baking course )
*** The dough is shaped like an envelope (Excerpt from Rugkop's online baking course )
Anyone can learn to bake light sourdough bread. Buy our online course and get flour and equipment delivered to your door.